A girl can never have too many bracelets. I love them, especially pretty, beaded ones that look great stacked. I’m usually surprised by the price of them in boutiques and at craft shows. Rarely do I buy these kinds of bracelets anymore because making them is easier than you might think. Plus they don’t take a lot of beads, so bracelets are a great way to use up some of your leftovers or highlight a few high-dollar beads.

Supplies:
- Beads
- .5 mm Clear, Stretchy Elastic
- 2 mm Crimp Beads
- Scissors
- Crimper or Pliers
- Scotch Tape (optional)

Step One:
Cut a piece of clear elastic long enough to fit around your wrist plus about 2 in. I like to cut the elastic bigger than I need so that it’s easier to work with once all the beads are strung.
Step Two:
String your beads. This is the longest part of the process for me. I often start off with one pattern and tweak it to make the proper length to fit my wrist. Spacer beads are your friend. If you need to add just a little more length, pop a couple of them onto the end of the elastic. I know that I’m done stringing when I can wrap the beads around my wrist and the ends meet.
Step Three:
Put 1 or 2 crimp beads on one end of your elastic. You can use only 1, and your bracelet will be fine. I like to use 2 just in case when I’m really fond of the beads or they are heavy. Then thread the other end of the elastic through the crimp beads, and pull the elastic taut.

Step Four:
Use your crimper or pliers to close the crimp beads. If you’ve never done this before, you smash the bead with the crimper or pliers. Then turn it 90 degrees, and smash it again.

To make it a little easier, I tape one end of the elastic down with scotch tape and hold the other end in my non-crimping hand. This allows me to keep the elastic taut and beads on the elastic.

Step Five:
Thread the elastic through the first couple of beads on each side, and cut off the excess. Your bracelet is now ready to be shown off to the world!
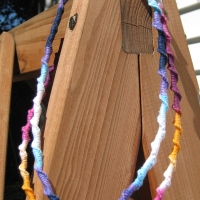
I love layering these with other bracelets. Rarely do I wear just one.

That look is a little extreme. Really I just wanted to show off some of the cool beads I’ve acquired the past few months. This is how I usually wear the bracelets.

I also like to gift them. Three bracelets in coordinating colors make for a lovely gift.


Happy bracelet making!


Your instructions are great, and your bracelets are beautiful! Do you have a favorite website to order beads? I’ve done the Michaels and Jo Ann shops locally but would love some different ones. I’m also hoping to find a site that sells metal charms and words to add to bracelets. Any advice would be great! 🙂
Thanks for the kind comments! All of the beads in these bracelets were bought at Michaels, Jo-Ann’s, and Hobby Lobby. When I do order beads online, I like http://www.beadaholique.com/. They have good variety and generally have lots of items on sale.